
No-Bake Biscoff Cheesecake Cups
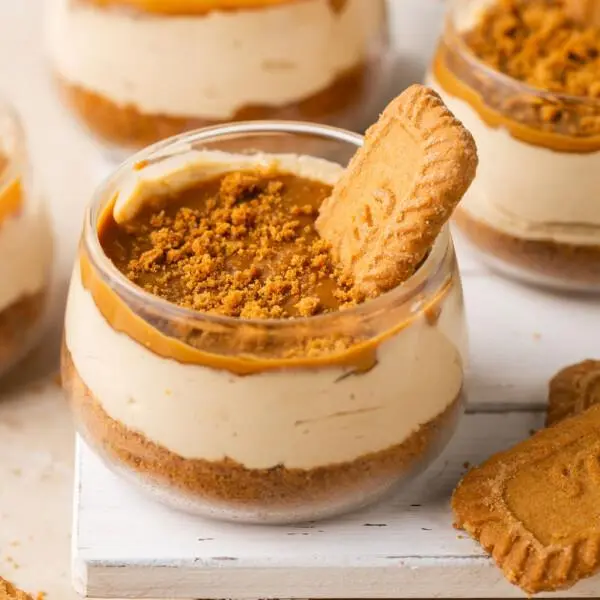
These No-Bake Biscoff Cheesecake Cups combine a buttery cookie crumb base, a smooth and creamy Biscoff cheesecake filling, and a glossy cookie butter topping. They're a delicious dessert for parties, family gatherings, holidays, or whenever you're craving a creamy cookie butter treat.
- Preparation
- 25 minutes
- Total
- 4 minutes
- Servings
- 12
Ingredients
FOR THE BISCOFF COOKIE CRUST
- Biscoff cookies — 250 g
- melted butter — ½ cup
FOR THE CHEESECAKE FILLING
- cream cheese, at room temperature — 500 g
- chilled all-purpose cream — 500 g
- Biscoff spread — 3 tbsp
FOR THE TOPPING
- Additional Biscoff spread, as needed, melted until pourable
Directions
Step 1: Crush the Cookies
Place the Biscoff cookies in a food processor and pulse until they become fine crumbs. If you don't have a food processor, put the cookies in a sealed food bag and crush them with a rolling pin.
Step 2: Prepare the Crust
Transfer the cookie crumbs to a mixing bowl. Pour in the melted butter and stir until the crumbs are evenly coated and resemble damp sand.
Step 3: Fill the Dessert Cups
Divide the buttery crumbs between your individual dessert cups. Press them down firmly with the back of a spoon to create an even base. Set aside.
Step 4: Beat the Cream Cheese
Place the room-temperature cream cheese in a large mixing bowl. Beat until smooth and creamy, scraping down the sides of the bowl as needed to remove lumps.
Step 5: Add the Chilled Cream
Add the chilled all-purpose cream and beat until the mixture is smooth, thick, and creamy. The exact whipping time will depend on the cream's fat content and whipping properties. Avoid overmixing.
Step 6: Add the Biscoff Spread
Add 3 tablespoons of Biscoff spread to the cheesecake mixture. Beat until evenly incorporated and the filling has a consistent cookie butter flavor.
Step 7: Pipe the Filling
Transfer the filling into a piping bag or a sturdy food-safe bag with the corner snipped off. Pipe an even layer over the prepared cookie crusts.
Step 8: Add the Biscoff Topping
Gently warm additional Biscoff spread until it becomes pourable but not hot. Spoon a thin layer over each cheesecake cup and spread carefully to cover the filling.
Step 9: Chill Until Firm
Cover the cups and refrigerate until the cheesecake filling is set. Allow at least 4–6 hours as a starting point, then verify that the filling holds its shape before serving. The final setting time depends on the cream used and the portion size.
Step 10: Serve and Enjoy
Serve the cups chilled. For the best presentation, keep the layers visible through clear dessert cups and add the topping shortly before serving if you want a particularly glossy finish.
Tips for Perfect No-Bake Biscoff Cheesecake Cups
- Use room-temperature cream cheese to help create a smooth filling without lumps.
- Crush the Biscoff cookies into fine, even crumbs so the crust holds together well.
- Mix the melted butter thoroughly with the cookie crumbs until the texture resembles damp sand.
- Press the crust firmly into each dessert cup to create a compact, even base.
- Keep the all-purpose cream chilled, and make sure it is suitable for whipping before adding it to the cheesecake mixture.
- Beat the cream cheese until smooth before adding the cream, then mix carefully to avoid overbeating or creating a runny filling.
- Warm the Biscoff spread gently until pourable, but let it cool slightly before adding it to the cheesecake cups.
- Pipe the filling into the cups for neat, even layers and an attractive presentation.
- Refrigerate the cups for at least 4–6 hours as a starting point, and serve only when the filling is sufficiently firm.
- Prepare the cups ahead of time and keep them covered in the refrigerator until serving.
- Store leftovers covered and refrigerated, and enjoy within 2–3 days for the best quality, provided the dairy ingredients remain fresh and properly stored.